In Excel, custom input or error messages explain the rules for each field to prevent data-entry errors. Imagine, for instance, that it's your job to create, maintain, and assign user IDs and passwords for your company employees. You create a spreadsheet to perform this task. Then you get transferred. So now you have to delegate this task to someone else. The best way to ensure the job is done right is to create input and error messages.
For the User IDs, first create an Error Alert that says, "No duplicates allowed." Then create an Input Message that, when displayed, explains what kind of data can be entered. And last, a backup Error Message for column E that says: "Only 7 digits allowed."
Create an Error Alert in Excel
1. Enter the following column headers on columns A through G: Sales Staff, User IDs, Passwords, Valid Dates, User IDs, Passwords, Valid Dates (again).
2. Set the width of column A to 24. Enter a dozen user names in column A (from A2 through A13 is adequate).
3. Change the column widths of B through G to 12: Home > Format > Column Width > 12, then click OK.
4. Highlight B2:B13.
5. From the DATA tab, click the Data Validation button, then select Data Validation from the drop-down list.
6. When the Data Validation dialog box appears, select the Settings tab, then click the tiny arrow beside the Allow field box, and select Custom from the drop-down list.
7. When the Formula field box appears, enter the following formula: =COUNTIF($B:$B,B2)=1.
8. Click the Style field box arrow and choose Stop, Warning, or Informationfor your Error Message icon.
9. Enter a Title in the Title field box (something that describes what your message is about).
10. Next, select the Error Alert tab, and enter a custom message in the Error Message field box: No duplicate User IDs allowed. Click OK.
11. Next, enter some random User ID numbers in column A. Repeat one of those numbers and note what happens: The Error Message box appears and displays your message.
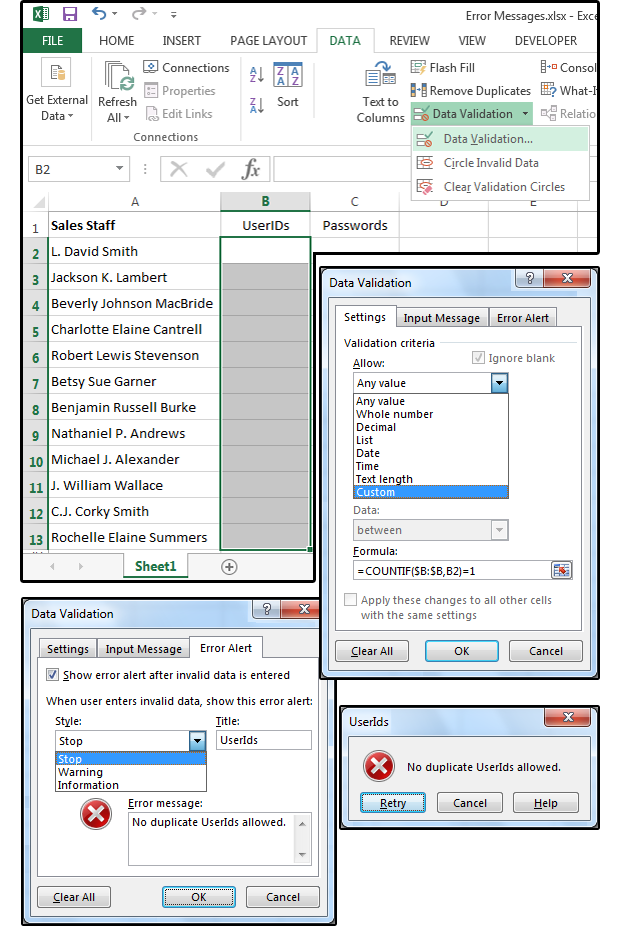 |
| Create a custom, user input Error Message based on a formula |
Input Message (with Error Message backup)
1. Highlight E2:E13.
2. From the DATA tab, select Data Validation > Data Validation.
3. When the Data Validation dialog box appears, select the Input Messagetab.
4. Enter a Title in the Title field box (something that describes what your message is about): User IDs
5. Then enter the user message in the Input Message box: Enter a 7-digit, numeric User ID.
Then click OK.
6. Notice that when you click anywhere in column E, the Input Message pops up on the screen with instructions regarding this field.
7. You can also add an Error Message in case the users enter more or less than seven digits.
8. Highlight column E, then select the DATA tab> Data Validation > Data Validation and choose the Settings tab.
9. Click the tiny arrow beside the Allow field box, and select Text Length from the drop-down list.
10. Enter Equal To in the Data field box, then enter 7 in the Length field box. Click OK.
11. Next, select the Error Alert tab, choose the Style field box and select Stop, Warning, or Information for your Error Message icon.
12. Enter a Title in the Title field box: User IDs
13. And last, enter a custom message in the Error Message field box: Only 7 digits allowed. Click OK.
14. Enter some random, seven-digit User ID numbers in column E. Enter one with more or fewer than seven numbers and note what happens: The Error Message box appears and displays your message: Only 7 digits allowed.

|
| Create a custom Input Message with an Error Alert backup. |
Create an Error Alert for passwords
For the Passwords, first create an Error Alert that says: No duplicates allowed. Then create an Input Message that, when displayed, explains what kind of data can be entered. And last, a backup Error Message for column E that says: Only 7 digits allowed.
Error Message
1. Highlight C2:C13.
2. From the DATA tab, select Data Validation > Data Validation.
3. When the Data Validation dialog box appears, select the Settings tab, then click the tiny arrow beside the Allow field box, and select Custom from the drop-down list.
4. When the Formula field box appears, enter the following: =EXACT(C2,LOWER(C2)). Click OK.
5. Next, select the Error Alert tab, and in the Style field box, choose Stop, Warning, or Information for your Error Message icon.
6. Enter a Title in the Title field box: Lowercase.
7. Then, enter a custom message in the Error Message field box: Only lowercase allowed for all passwords. Then click OK.
8. Next, enter some random passwords in column C. Try to enter an uppercase letter and then note what happens: The Error Alert box appears and displays your error message: Only lowercase allowed for all passwords.
 |
| Create an Error Message based on the lowercase formula. |
Input Message
1. Highlight F2:F13.
2. From the DATA tab, select Data Validation > Data Validation > Input Message tab.
3. Enter a Title in the Title field box: Passwords
4. Enter the user message in the Input Message box: Enter a lowercase password between 8 and 10 characters. Click OK.
5. Click anywhere in column F, and notice the Input Message pops up on the screen with instructions regarding this field.
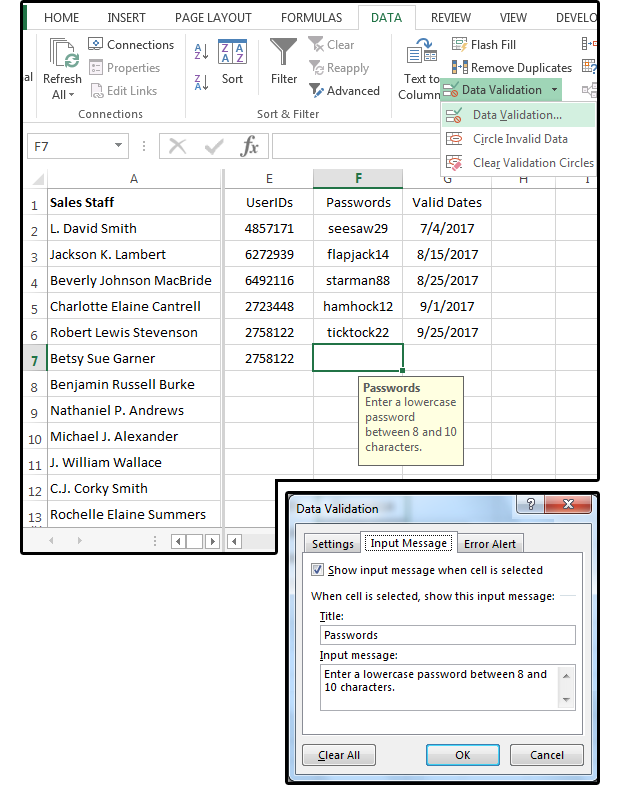 |
| Create a custom Input Message for passwords. |
Error Message
1. Highlight D2:D13.
2. From the DATA tab, select Data Validation > Data Validation > Settingstab, and then select Date from the drop-down in the Allow field box.
3. In the Data field box, select Between.
4. Enter 7/1/17 in the Start Date field box and 9/30/17 in the End Date field box. Click OK.
5. Next, select the Error Alert tab, and in the Style field box, choose Stop, Warning, or Information for your Error Message icon.
6. Enter a Title in the Title field box: Date.
7. Then, enter a custom message in the Error Message field box: Must enter a valid 3rd quarter date: between 7/1/17 and 9/30/17. Then click OK.
8. Next, enter some random Dates in column D that do not fit these parameters and note what happens: The Error Alert message box appears and displays your error message: Must enter a valid 3rd quarter date: between 7/1/17 and 9/30/17.
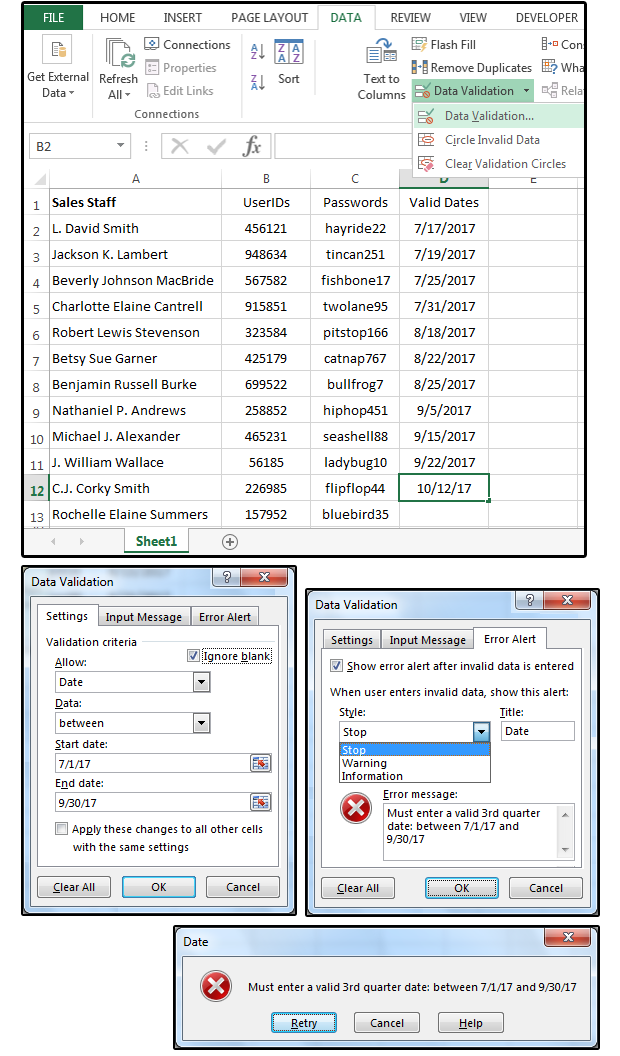 |
| Create an Error Message based on a range of dates. |
Input Message
1. Highlight G2:G13.
2. From the DATA tab, select Data Validation > Data Validation > Input Message.
3. Enter a Title in the Title field box: Valid Dates.
4. Enter the user message in the Input Message box: Enter a valid 3rd quarter date: between 7/1/17 and 9/30/17. Then click OK.
5. Click anywhere in column G, and notice the Input Message pops up on the screen with instructions regarding this field.
 |
| Create a custom Input Message for valid dates. |
Note that there are eight Allow fields, eight Data logical operators, and hundreds of functions and formulas that you can use to customize your spreadsheets for user restrictions and data input. Play around with it and see what happens. Good luck!
To comment on this article and other IT-HungamaSoft content, visit our Facebook page or our Twitter feed.


 The Bootstrap Studio Professional Edition comes with a number of free, beautifully responsive templates. Each template consists of multiple pages and widgets that can be pick-and-match into the perfect website. Developers and Programmers can customize these templates and reuse them in their projects. During the development, it offers a real-time preview. In the development phase, developers can open their design in multiple web browsers and devices, and every CHANGE they make within the app is shown instantaneously everywhere. For programmers, Bootstrap Studio gives full control to edit the code of CSS, SASS, JavaScript, and HTML. Let’s keep this simple, Bootstrap Studio 2.2.4 Pro is a must-have program for professional web development.

